
Explore Scientific
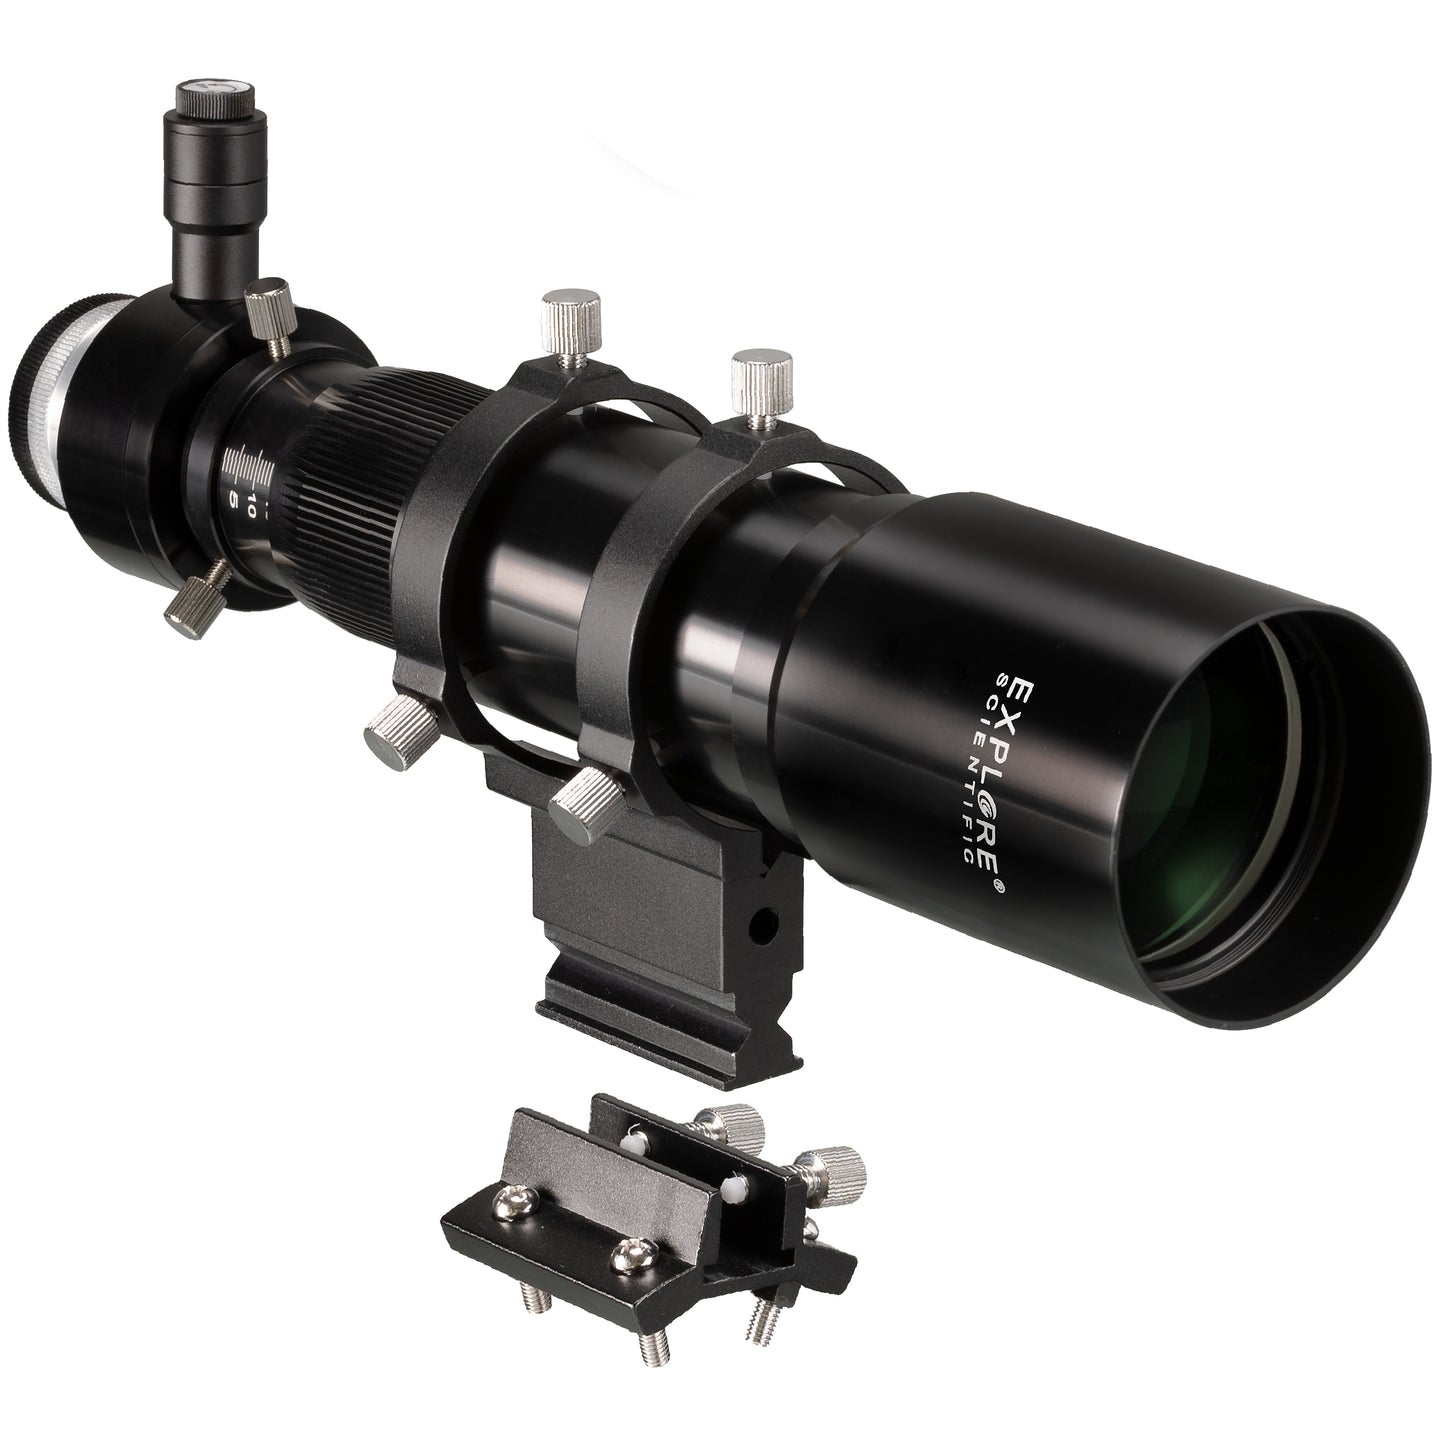
EXPLORE SCIENTIFIC 10x60 Finder Scope and Guider with Helical Focuser and 1.25 inch and T2 Connection
EXPLORE SCIENTIFIC 10x60 Finder Scope and Guider with Helical Focuser and 1.25 inch and T2 Connection
Regular price
$274.00
Regular price
Sale price
$274.00
⚠️ IMPORTANT: Duties and taxes are not included.
Shipping calculated at checkout.
In stock
Quantity
Couldn't load pickup availability
60 mm Universal Guide Scope and Finder with 250 mm Focal Length
Excellent 10x60 finder with removable eyepiece unit and reticle with adjustable red illumination. The larger aperture and focal length offer an even clearer field of view and more precise tracking thanks to higher resolution. The precision helical focuser and the 1.25-inch/31.7 mm connector, as well as the T2 camera connection thread (M42x0.75 mm), enable the "autoguiding" necessary for long-exposure imaging, in order to obtain pinpoint star images. It can also be used as a mini travel telescope.
High-quality 10x60 finder with adjustable reticle illumination
The image sharpness and viewing characteristics of this finder clearly exceed those of conventional 10x60 finders. The generated field of view is clear and extremely sharp. In addition, this finder has a very large field of view (FOV) of 6.0 degrees. This greatly facilitates finding and adjusting objects. The scale marks (division = 0.85 degrees) of the reticle are a good reference for estimating distances, and the open central mark also facilitates precise centering of objects. All lens surfaces are weather-protected with multiple coatings and ensure a clear finder image thanks to high light transmission values. The adjustable red LED illumination is powered by two LR41 button cells. The main objective and the reticle can be focused independently, so you can adjust the perfect focus for your eyes.
Compact guiding unit for "autoguiding"
One of the main applications of this telescope is so-called "autoguiding." With this function, the usually larger photographic optics are actively corrected by a smaller guide scope with a second guiding camera. This means that mechanical oscillations that occur in all astronomical telescope mounts in tracking precision are measured by the guiding camera and compensated accordingly. This is necessary to obtain pinpoint star images in long-exposure astrophotography and to avoid star trails. For this purpose, the guide scope is installed in the finder shoe of the photographic optics and oriented parallel. If the existing finder shoe is not compatible, a suitable finder shoe is included. A guiding camera can then be mounted with the 1.25-inch/31.7 mm connection located at the rear end or via the T2 thread connection (M42x0.75 mm). This is securely held by a brass compression ring and three retaining screws. Please note the necessary back focus for your guiding camera. The focal plane (back focus) is approx. 22 mm behind the T2 thread. Precise focusing on the guide star is done using a large knurled wheel of the precisely machined helical focuser. To facilitate reproduction of the focus point, it has a white laser-engraved millimeter scale from 0 to 28 mm. Once the guiding camera is connected directly or via computer to the telescope mount and the necessary basic settings have been made, the first long-exposure astrophotos can be taken.
Use as a mini travel telescope
This guide scope and finder can also be very easily used as a mini travel telescope. By optionally available eyepieces, magnifications from 9x to 50x can be achieved. Almost all eyepieces with a focal length of 5 to 26 mm and a 1.25-inch/31.7 mm connection are suitable. EXPLORE SCIENTIFIC eyepieces of the LER series 52 degrees (art. 02195xx) and 62 degrees (02196xx) are especially recommended. Note: only direct viewing is possible.
Metal finder bracket and finder shoe
The bracket of this guide scope and finder is made entirely of aluminum and forms a stable base. The finder bracket is suitable for many common telescope types such as, for example, EXPLORE SCIENTIFIC, BRESSER MESSIER, etc. If the existing finder shoe is not compatible, a suitable finder shoe is included. It can be attached to the telescope tube using four M5 screws. The distances between the holes of the finder shoe are 31.7 mm in the longitudinal and transverse axis. With the six large adjustment screws with a non-slip knurled grip, the finder can be effortlessly oriented, even with numb fingers. All adjustment and clamping screws have plastic tips to effectively prevent scratching the housing and the finder bracket.
FEATURES
- Excellent 10x60 guide scope and finder
- Can also be used as a mini travel telescope
- Perfect image sharpness and good viewing characteristics
- FMC multi-coated lens surfaces
- Objective focal length: 250 mm
- Max. permissible camera weight: 550 g
- Removable eyepiece/reticle unit
- Camera connection via 1.25-inch/31.7 mm connector or T2 thread
- T2 thread: M42 x 0.75 mm
- Precision helical focuser for focusing the field of view
- Helical focuser adjustment travel: 28 mm
- Minimum focusing distance: 3 m
- Laser-engraved millimeter scale from 0 to 28 mm on the focusing mechanism
- The focal plane (back focus) is approx. 22 mm behind the T2 thread
- Separate reticle focusing in the eyepiece
- Very large FOV of 6.0 degrees
- With adjustable red reticle illumination
- Reticle scale marks with 0.85-degree division
- Power supply: two LR41 button cells
- Brass compression ring and three retaining screws on the 1.25-inch connection
- With optional eyepieces, magnifications from 9x to 50x can be achieved
- Almost all eyepieces with 1.25-inch/31.7 mm connection are suitable
- The finder scope bracket is made entirely of aluminum
- Finder bracket with six large adjustment screws with non-slip knurled grip
- Finder shoe suitable for EXPLORE SCIENTIFIC, BRESSER MESSIER, etc.
- An additional suitable finder shoe is included
- The distances between the holes of the finder shoe are 31.7 mm in the longitudinal and transverse axis
- Adjustment and clamping screws have plastic tips
INCLUDES
- 10x60 finder/guide scope
- Eyepiece unit with reticle
- Reticle illumination incl. batteries
- Finder bracket with finder shoe
- Instruction manual
SEGURIDAD PRODUCTOS
Fabricante: Bresser Iberia SLU | Valdemorillo, 1 - nave B | 28925 Alcorcón ESPAÑA | https://www.bresser-iberia.es/
⚠️ NOTAS DE ADVERTENCIA
GAFAS PARA LA OBSERVACIÓN DE ECLIPSE
- INSTRUCCIONES: Revise antes de cada uso. No utilice ni deseche si está dañado, rasgado, perforado o separado de alguna manera del marco. No lo use con otros dispositivos ópticos. No es un juguete. Los niños deben usarlo solo bajo la supervisión de un adulto. Limítese a 3 minutos de uso continuo, con interrupciones durante varias horas. No se mueva mientras usa este producto, no conduzca un vehículo ni opere maquinaria. No lo use si tiene un ojo enfermo o después de una operación ocular.
- ADVERTENCIA: Nunca mire directamente al sol sin protección ocular especial. Siempre use gafas de eclipse al observar el eclipse solar, especialmente si una parte del sol es visible. Mirar directamente al sol puede causar daños permanentes si no se toman las precauciones adecuadas. Se debe usar protección ocular adecuada, diseñada específicamente para la observación solar, para evitar que los rayos dañinos del sol lleguen a los ojos. Deséchelo después de 3 años y no lo utilice después de ese tiempo.
OBSERVACIÓN SOLAR CON TELESCOPIO
- Nunca mire al sol a través de un ocular/telescopio sin un filtro de protección verificado. Un filtro lunar nunca puede usarse para la observación solar. El filtro lunar solo es adecuado para la observación de la luna. El filtro solar debe montarse en la apertura del telescopio, no en el ocular. De lo contrario, el rayo de luz concentrado por la óptica destruirá inmediatamente la película del filtro, lo que provocará daños oculares graves e incluso ceguera total.
- Revise el filtro solar antes de cada observación solar y asegúrese de que no esté dañado. Manténgalo frente a una fuente de luz intensa para poder detectar posibles grietas y/o agujeros. No use el telescopio para la observación solar, incluso si el filtro solar está solo ligeramente dañado. En este caso, comuníquese con el fabricante para obtener las piezas de repuesto correspondientes.
- Siempre use el filtro solar cuando observe el sol. Asegúrese de que este filtro esté colocado correctamente en el telescopio según las instrucciones. El uso del filtro solar está destinado únicamente para su uso con este telescopio.
- Revise el ajuste del filtro solar antes de cada observación solar. Si se suelta accidentalmente de la abertura del objetivo, esto puede causar daños oculares inmediatos y permanentes, e incluso ceguera.
- Si el filtro solar no puede montarse de manera suficientemente firme en el tubo, mejore el ajuste colocando varias tiras de fieltro autoadhesivas o similares entre el filtro solar y la abertura del objetivo. Nunca use el filtro solar si no puede colocarse correctamente en el telescopio. En tal caso, siempre contacte primero con nuestro servicio al cliente.
- Tenga mucho cuidado al observar el sol. Incluso una mirada corta a través de la óptica sin protección puede causar daños oculares graves e incluso ceguera total.
- Los niños, incluso con el filtro montado correctamente, no deben mirar al sol a través del telescopio. Nunca deje a los niños sin supervisión.
- Nunca deje la óptica sin supervisión. Los niños y los adultos inexpertos podrían dirigir el telescopio hacia el sol sin las precauciones adecuadas y perder la vista.
- No realice observaciones solares sin la consulta previa de un médico después de una operación ocular o cualquier otra enfermedad ocular.
- Las ondas/pliegues en la película son normales y no constituyen un defecto del producto.
- No exponga el dispositivo a altas temperaturas.
ADVERTENCIAS Y SEGURIDAD DE LAS PILAS
- NO USE pilas falsas en los productos. Use solo las pilas proporcionadas. Use la pila EXCLUSIVAMENTE para el propósito previsto.
- Guarde las pilas fuera del alcance de los niños y mascotas.
- NO USE pilas que parezcan tener la carcasa dañada, inflada o modificada. No use pilas que hayan goteado, huelan, estén hinchadas o derretidas o presenten abolladuras, óxido, grietas o rayones.
- La pila NO debe ser desmontada, aplastada, perforada, triturada ni manipulada de ninguna otra forma.
- La pila NO debe exponerse a líquidos.
- No debe intentar secar una pila mojada o húmeda con un dispositivo o fuente de calor.
- El dispositivo o la pila NO deben ser colocados cerca de una fuente de calor o bajo la luz solar directa.
- La pila NO debe tocar objetos metálicos.
- La pila NO debe ser almacenada junto a materiales peligrosos o inflamables. Guarde la pila en un lugar fresco, seco y bien ventilado.
- La pila NO debe insertarse incorrectamente al cargarla.
- La pila NO debe cargarse bajo luz solar directa ni a temperaturas extremas. Cárguela a temperatura ambiente (20 °C – 26 °C).
- Evite dejar caer la pila o el producto. Si sospecha que la pila está dañada, reemplácela.
- Nunca deje su dispositivo conectado a la corriente más de 24 horas. Deje que la pila se agote y luego recárguela.
- Para obtener los mejores resultados, reemplace las pilas según el uso después de 12 meses o antes.
- Siga las regulaciones locales para la eliminación de las pilas usadas. NO arroje la pila al fuego ni al agua.